
Page 126 - MSc_thesis_R A Kil
P. 126
6. Once the sample has a rubber seal, cut off one edge of the tyre. Make sure the seal aligns perfectly
with the edge of the sample. The other end of the rubber sleeve is left intact.
7. In order to improve the sealing capacity, wrap tape around the seal where the sample is placed
(figure 3.4. Make sure to apply enough force to create a tight seal. Especially the tape around the
open end of the sample needs extra care.
8. Pull the loose end of the tyre with the sample around the long PVC tube. The sample should touch
the tube, so no space may be left in between. Again, wrap tape around the rubber to improve the
seal with the tube.
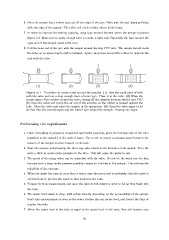
(1) (2) (3) (4)
Figure E.1 – Procedure to create a seal around the samples. (1) Take the small piece of tube
with the valve and cut a long enough piece of inner tyre. Place it in the tube. (2) Wrap the
excess edges of the rubber around the tube, closing off the annulus between rubber and PVC.
(3) Open the valve and pump the air out of the annulus, so the rubber is pressed against the
tube. Close the valve and place the sample in the apparatus. (4) Open the valve again to let
air flow into the annulus squeezing the rubber tyre around the sample. Unwrap the edges.
Performing the experiments
1. Once everything is prepared, connected and sealed properly, place the bottom end of the tube
(attached to the sample) in the tank of water. Use a coin to ensure a constant space between the
bottom of the sample and the bottom of the tank.
2. Start the vacuum pump leaving the three way valve closed in the direction of the sample. Turn the
valve a little to create under-pressure in the tube. This will cause the water to rise.
3. The speed of the rising water can be controlled with the valve. Do not let the water rise too fast,
because such a large under-pressure possibly creates air bubbles in the sample. This reduces the
reliability of the outcome.
4. When the water has risen to more than a metre, stop the pump and immediately close the valve in
all directions to prevent the water to flow back into the tank.
5. Prepare for time measurement, and open the valve to full extent in order to let air flow freely into
the tube.
6. The water level starts to drop, with a flow velocity depending on the permeability of the sample.
Start time measurement as soon as the water reaches the one metre level, and record the time at
regular intervals.
7. When the water level in the tube is equal to the water level in the tank, flow will become very
93